Building Preesm
Prerequisite:
- Install git
- Building Preesm requires an active Internet connection, used to fetch Maven and/or Eclipse dependencies. This Internet connection is not required for running Preesm once built.
Note: if you need to work with Graphiti source code, please read these instructions first.
Tutorial created the 04.24.2012 by M. Pelcat
Updated the 26.01.2024 by H. Miomandre
Disclaimers
- When building PREESM, you have to run a second Eclipse Application (the guest) within the Eclipse where the source code is imported (the host). This is explained below in the “Execution of Preesm” section;
- When using unreleased source code (that is any other commit different from the last tag), there could be some inconsistencies between released zip files (Preesm projects) used in tutorials and the Preesm tool itself;
Eclipse installation
Install Java
Preesm requires the Eclipse environment, which runs on the Java platform. If you do not have Java yet, the Eclipse IDE will provide it. Otherwise, make sure the to have the version 21 Java.
Latter Java versions have not been tested.
Eclipse
Eclipse is an extensible platform programmed in Java that allows developers to write their own IDE (Integrated Development Environment).
You can download and run the Eclipse installer here: https://www.eclipse.org/downloads/packages/installer. As of writing, the latest version (2025-03) works without issues. During installation, choose “Eclipse IDE for RCP and RAP Developers” package to develop in Preesm and make sure to select Java 21 as the java VM (either from your existing installed Java environment or provided by the installer). Install Eclipse in a folder where you have write access.
Run Eclipse by clicking on the eclipse file, you need to choose a workspace, i.e. a directory where the metadata of and/or your projects will be stored.
Install Development Requirements
In Eclipse:
- Go to “Help > Eclipse Marketplace…”;
- From the marketplace, install Checkstyle Plug-in, and the SonarQube Eclipse plug-in.
No need to restart Eclispe when prompted. - Go to “Help > Install New Software…”;
- In “Work with:”, choose the first Eclipse address:
2024-12 - https://download.eclipse.org/releases/2024-12/from the drop-down menu. - Look for Modeling -> EMF - Eclipse Modeling Framework Xcore SDK (search for “xcore”) Modeling -> Xtext Complete SDK, and Programming Languages -> Xtend IDE (search for “xtend”).
Click Next, accept the terms of the license agreement when asked. Wait for the end of installation. - Restart Eclipse to complete the installation.
Import Preesm projects
You need to get the code from the git repository and import the projects into Eclipse. Our git repository is hosted by Github (see the Preesm team page on Github).
Clone the Preesm repository (git clone <url>, in the folder where you want to place your local repository):
-
git clone https://github.com/preesm/preesm.git(https) -
git clone git@github.com:preesm/preesm.git(SSH)
Switch to the develop branch (git checkout develop) to get the latest developer version of our source.
Add the Preesm sources into Eclipse:
- Go to “File > Open Projects from File System…”
- In “Import source:” provide the path to the cloned git repository.
- Ensure the option “Search for nested projects” is checked.
-
Select the following projects:
org.preesm.algorithmorg.preesm.cliorg.preesm.codegenorg.preesm.codegen.xtendorg.preesm.commonsorg.preesm.graphiti.modelorg.preesm.graphiti.uiorg.preesm.model.pisdforg.preesm.model.scenarioorg.preesm.model.slamorg.preesm.uiorg.preesm.ui.pisdforg.preesm.ui.scenarioorg.preesm.ui.sdforg.preesm.ui.slamorg.preesm.workflow...org.preesm.target-platform...org.preesm.algorithm.testsorg.preesm.framework.testsorg.preesm.graphiti.model.testsorg.preesm.graphiti.ui.testsorg.preesm.integration.tests...org.preesm.model.tests-
org.preesm.ui.tests
* There should be 24 selected projects.
- Click on Finish.
Compilation of Preesm
Close “Welcome” tab.
Eclipse should start the compilation right-away while the dependencies of Preesm as not yet been imported, resulting in compilation errors. While Preesm is being compiled, open the file org.preesm.target-platform/org.preesm.target-platform.target and click ONCE on Set as Active Target Platform in the top right corner of the opening window to instruct Eclipse to fetch the dependencies required by Preesm. The only feedback provided by Eclipse is the small progress bar in the bottom right corner.
Click just once and have a coffee, even if nothing seems to happen. Eclipse will load the required dependencies and compile sources on its own.
If compilation errors remain, please check your Java version (see above), then try refreshing and cleaning projects with errors, and reloading the target platform.
Execution of Preesm
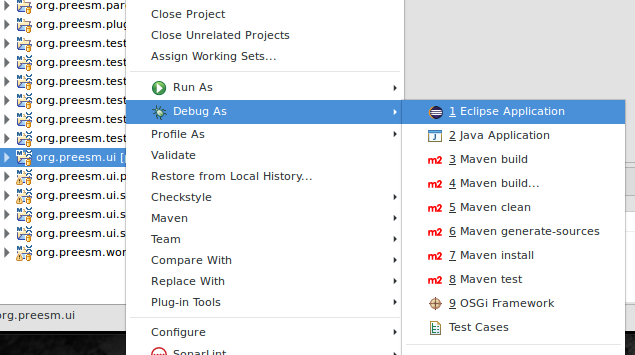
Right-click on the ‘org.preesm.ui’ plug-in, the click on Run As > Eclipse Application.
A new Eclipse session is launched that behaves like the one obtained by Preesm users from the update site. The difference is that you can debug and modify code in the first Eclipse and test at the same time in the second Eclipse. You can see the tutorials to learn how to use the second Eclipse, import Preesm projects and test.
Building the Eclipse Product
This section describes how to build and export the Eclipse Product of PREESM, i.e. the standalone executable of PREESM (as folder structure or Zip archive).
This procedure requires Maven 3.9+ and JDK 21. If your operating system does not come with an appropriate version of Maven, it can be downloaded from HERE. Installation instructions can be found HERE.
The Maven executable needs to be in your PATH.
Note: Make sure your Eclipse client used for PREESM development is closed during Maven execution as the automatic build of Eclipse can conflict with Maven build.
After installing Maven, run mvn clean package -DskipTests from the root of the git repository. Maven compiles Preesm sources and builds the Preesm product. This can also be done with the provided releng/build_product.sh script.
The releng/build_and_test.sh script will build PREESM and run unit and integration tests.
When the build process has terminated successfully, the resulting products and archives will be located under releng/org.preesm.product/target/products/.
Troubleshooting
-
I followed all steps but there are compilation errors
- (1) The build state of the Eclipse workspace can be corrupted after an update. To fix that, restart Eclipse then clean and rebuild your workspace.
-
(2) Try reloading the target platform in
org.preesm.target-platform/org.preesm.target-platform.targetby clicking on Reload Target Platform.
-
Missing artifact com.sun:tools
 1.8.0 is missing: This happens because Eclipse is running using a JRE instead of a JDK. Some Eclipse plugins needs Java packages that are not bundled with the JRE, but only with the JDK. If you installed the JDK, note that by default the JDK distribution for Windows also installs a JRE. Also, the installer adds a section in the PATH variable, that points to
 C:\ProgramData\Oracle\Java\javapath, which is an alias to the JRE binaries. Please refer to this page for fixing the issue. Basically, it tells to prepend the PATH variable with the path to the JDK, while not removing the...\javapathsection. - The Preesm runtime throws a popup error message on every interaction: Ensure that the version 21 of Java is used if you happen to have multiple installe at the same time.
Known Issues
- I still have issues setting up the Preesm developement environment: If you find one that can be reliably reproduced, please create an issue with the required informations.