New Workflow Task
Before proceeding you need to do: Building Preesm and Tutorial Introduction.
Note that the two Eclipse installation asked for these two tutorials are different, you should use in the following the Preesm developer installation from Building Preesm.
Tutorial created the 12.10.2012 by K. Desnos
Updated 10.04.2019 by A. Morvan
What is a Workflow Task?
A workflow is an executable graph that applies transformations to models (architecture, algorithm, …). For example, the following workflow which is used in Tutorial Introduction, is designed to map and schedule an algorithm on an architecture, both defined in the executed scenario, and to generate the corresponding source code.
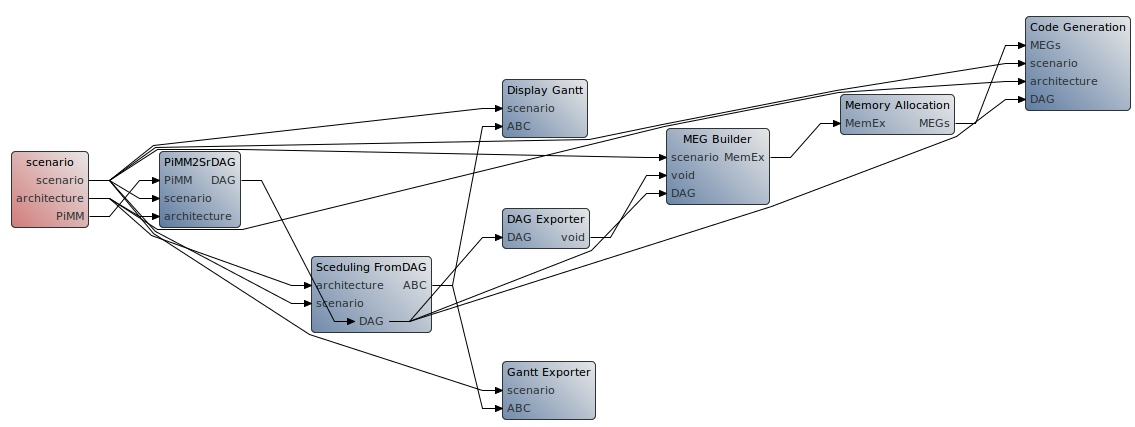
Within the workflow graph, each “vertex” - or “workflow task” - performs a specific action on one or several inputs. For example, the “PiMM2SrDAG” workflow element takes as input an algorithm modeled as a PiSDF graph and outputs DAG version, where flattening and single rate transformations have been applied.
How to create your own Workflow Task
In the remainder of this tutorial, we will create a new dummy workflow task whose purpose is to multiply by a given factor all the production and consumption rates of an algorithm graph.
Creation and configuration of a new eclipse plugin
The Eclipse IDE integrates a powerful plugin mechanism that allows the seamless integration of new functionalities to the IDE. For example, Graphiti and Preesm each consist of a set of Eclipse plugins. Consequently, the easiest way to add new features to Preesm is to create your own plugin. To create a new plugin, in the Eclipse instance where the Building Preesm tutorial was done:
- Right-click in the package explorer and select “New->Other…”.
- In the wizard, select “Plug-in Project” and click Next.
- Give a name to your project (following the Java Package Naming Conventions)
- Select the location of your project.
- Click Next.
- Fill up the details for your project
- uncheck the “UI contribution” box;
- if you plan to have special actions during the plug-in start/stop phases, check the “generate an activator…” box (see example here);
- click Next;
- Uncheck the “Create a plug-in using…” box and click on Finish;
- Do not enter the perspective (and remember choice).
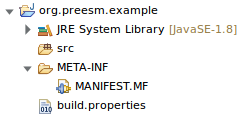
The following project appears in your Package Explorer:
Before creating a new workflow task, you must first configure the dependencies of the plugin project:
- Open “META-INF/MANIFEST.MF” with the plugin manifest editor.
- In the Overview tab, mark your plugin as a Singleton:

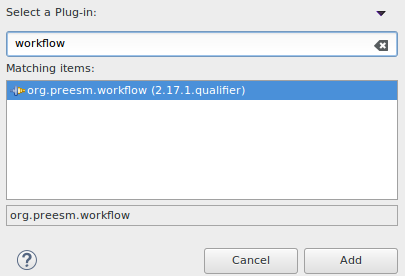
- In the “Dependencies” tab, click on the “Add” button of the “required Plug-ins” frame.
- Select the “org.preesm.workflow” plugin and click OK (version may differ):
- Save the modification of MANIFEST.MF.
To complete the plugin configuration, repeat steps 3 to 5 and add the following plugins to the list:
- org.eclipse.core.runtime
- org.preesm.algorithm
Finally, the plugin must register as a preesm plugin:
- Open “plugin.xml” and go to the “Extension” tab;
- Click on “Add…”, then filter with “preesm” and select “org.preesm.commons.plugin”;
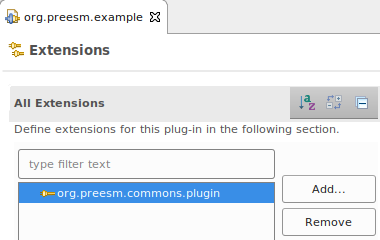
- Click on Finish then save with CTRL+S;
Creation of a new workflow task
The next step consists of creating the class that will implement the behavior of the workflow task:
- In the package Explorer, right-click on the plugin project and select “New->Class”
- Give a name the class and make it inherit from “AbstractTaskImplementation”.
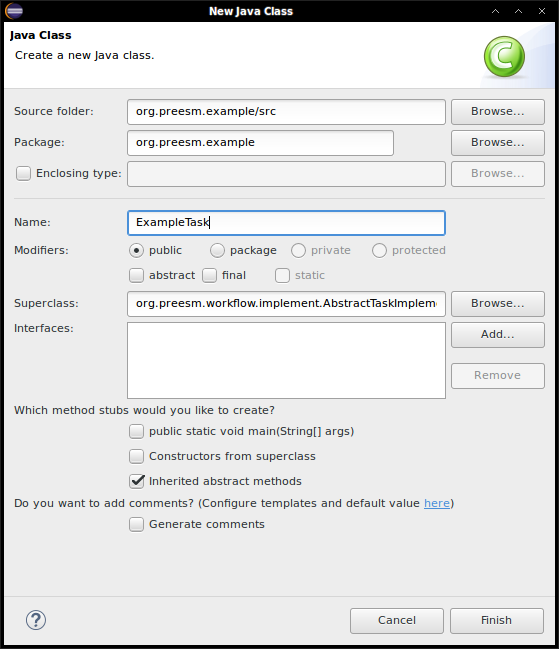
- Click on Finish. The new class file will automatically open.
Implementation of the new workflow task
The monitorMessage() method returns a message that will be displayed in the Console of Preesm when the workflow task is executed. Here is an example of implementation for this task:
public  String  monitorMessage()  {
  return  "Starting Execution of Example Task ";
}
The getDefaultParameters() method returns a Map of Strings containing the parameters of the workflow task and their associated default values. These parameters can be edited in the “Properties” tab of Preesm when the workflow task is selected in a workflow. In our example, we have a unique parameter called factor whose default value is 1. Here is the corresponding code:
public  Map<String,  String>  getDefaultParameters()  {
  Map<String,  String>  defaultParams  =  new  HashMap<String,  String>();
  defaultParams.put("factor",  "1");
  return  defaultParams;
}
The execute(…) method is called when the workflow task is executed. Its inputs are:
- A Map containing the inputs of the workflow task (e.g. An algorithm graph, an architecture, …)
- A Map containing the parameters of the workflow task
- An IProgressMonitor that can be used to track the progression of the workflow task
- A String containing the name given to the instance of the workflow task
- The Workflow where the workflow task is instantiated
The code of the execute method for our example is available here.
Annotating the New Workflow Task
Before being executed, the new workflow task must first be registered. To do that:
- Open the new Java class
- Go to the top of the class and add the following annotation
@PreesmTask(
	id = "my.unique.workflow.task.identifier",
	name = "Example Task",
	inputs = {@Port(name = "PiMM", type = PiGraph.class)},
	outputs = {@Port(name = "PiMM", type = PiGraph.class)}
)
public class ExampleTask extends AbstractTaskImplementation {
Mandatory fields of the annotation are id, name, inputs and outputs. Other fields are used for documentation only.
More details about the PreesmTask annotation can be found in the source code. The full Java class is available here.
Test of the new workflow task
- Launch Preesm as explained in the Building Preesm tutorial.
- Open a workflow (for example, the one given in introductory tutorial).
- In the workflow, create a new Task using the “Palette” on the right of the workflow editor.
- Give a name to your task.
- Select the newly added task and edit its “Basic” properties in the bottom of the window.
- Set the “plugin identifier” property with the id used to register the workflow.tasks extension.

- Save and go to the “Task Variables” properties of the workflow task. The “factor” parameter should appear. (If not, go back to the Preesm project, clean, rebuild and launch).
- Set the value of the “factor” parameter.
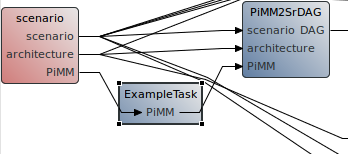
- Connect the task in the workflow. For example, insert it between the “scenario” and the “PiMM2SrDAG” tasks. To add a new connection, select “Data transfers” in the editor Palette and successively click on the source and target of the connection. Make sure to give the proper names to input and outputs.
- Save the workflow and execute it as explained in introductory tutorial. The logger should display the lines in the early stages:

You can now do a few tests with the new workflow task. For example, try changing the factor parameter into a negative number or a string of characters. You can also put breakpoints in the code of the task to follow its execution step-by-step.
The complete plugin project built along this tutorial is available here.
Registration of the New Workflow Task - The Old Way (now deprecated)
Note: since Preesm 3.6.0, this method does not work. See new method above
Before being executed, the new workflow task must first be registered as an extension of org.preesm.workflow.tasks. To do that:
- Open the MANIFEST.MF file of your plugin and go to the “Extensions” tab.
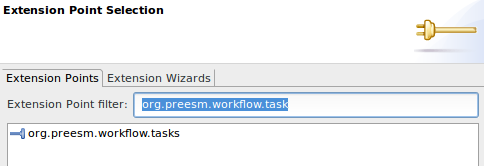
- Click on “Add…” to open the “New Extension” Wizard.
- Select “org.ietr.dftools.workflow.tasks” and click “Finish”.
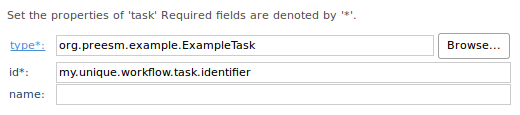
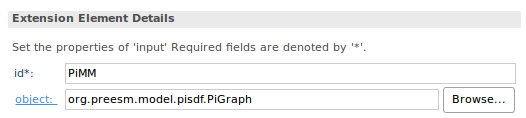
- Fill the “Extension Element Details”:
- Browse or just copy the fully qualified name of the class you just created to fill the “type” field.
- Give a identifier to the workflow task in the “id” field. This identifier will be used to lookup the task in the workflow editor/executor.
- The name is optional and can be left empty.
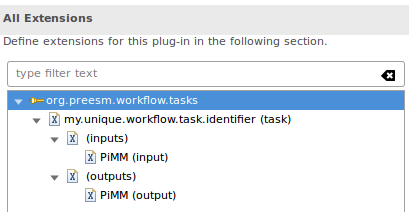
- Right-click on your extension name in the extension list and select “New->inputs”
- Right-click on “(inputs)” and select “New->input”
- Fill the “Extension Element Details” of the input as follows:
- Save and repeat steps 5 to 7 to add an output “PiMM” to your workflow task. The extensions list should look like this:
Note: In the extension details of step 4, the field id is what makes the link with the tasks defined in the Workflows (see step 6 of next section).
Finally, the package containing the workflow task must be exported by the plugin in order to be usable by the workflow manager.
- In the MANIFEST.MF file, go to the “Runtime” tab.
- In the “Exported Packages” section, click on “Add…”
- Select the package containing the task class and click “OK”
- Save the MANIFEST.MF. The new Workflow task is now ready to be used.