Developer Documentation
git
Configure git
git uses your email address to identify your commits, as well as a user name (basically your full name) to make it easier to trace commits. In order to set the email address and user name git will use in your commits, you need to launch the following commandlines, where
- git config –global user.name
- git config –global user.email
Create a github account
PREESM and Graphiti sources are hosted on Github repositories.
In order to contribute to PREESM or Graphiti (i.e., push to the corresponding Github repository), you will thus need to get a Github account and to be acknowledged as a contributor of the concerned project.
To do so, first create a Github account and make sure the email address your registered in your git configuration (see above) is one of the registered email addresses of your Github account (Github > Account settings > Emails).
You can also add one or more SSH keys to your Github account (Github > Account settings > SSH Keys), which make it easier when working with Github repositories (Github won’t ask you your login and password each time you want to pull or push).
You can get the code and propose contributions without being part of the teams of contributors through the Fork & Pull request process (learn more about the Fork & Pull model).
Development workflow for PREESM and Graphiti
Each of our repositories get two main branches (which are permanent):
- The master branches are dedicated to contain the clean and stable code and are modified only by releases of new versions of our softwares ; you should NOT commit or push to the master branch of a repository and you should NOT merge into a master branch. Push to master are blocked for all except members of preesm/admins.
- The develop branches are the integration branches where new features are merged and tested ; they contain the latest version of the code. Push to develop are blocked for all except members of preesm/admins.
As a contributor of the PREESM and/or Graphiti projects, we ask you to follow the following wokflow when developing:
- Clone the needed repositories on develop branch (
git clone <url> -b develop, see also Building Preesm) - Start your own development branch(es) dedicated to the new features you want to add/the bug you want to fix (
git checkout -b <new-branch-name>) - Frequently check for latest version of the code. From your branch with all changes committed:
- Sync remote repository:
git fetch --all - Rebase your branch on latest develop from remote repoistory:
git rebase origin/develop - Force push if there is a divergence:
git push -f
- Sync remote repository:
- When finished, after rebasing it on latest develop (see step above), create a pull request for one of the admins to merge it.
If you encounter conflicts during the process and do not know how to manage the situation, have a look at our doc on solving git conflicts.
Build Status Notifications
Build status notifications are directly handled by Github with the email address used by your Github account, make sure your local git config mail address matches one of the github verified mail address:
- Check your local git config mail address, and change it to a valid one if it is not already the case:
git config --global --edit - Sign in on GitHub, got to Settings / Emails, and check that the mail address is present. If not, add it to the list and make sure that it is verified before going further.
Non-Regression Tests
Automatic testing is key to prevent regression. Preesm tests are run automatically at every push Github Actions. To run the tests, Actions simply calls the script releng/build_and_test.sh. It fully builds and test of all Preesm plugins (see below for details).
Builds can fail for many reasons, as compilation error, broken coding policies, or test failures. Compilation errors and broken coding policies should be enforced by the Eclipse IDE. Tests however have to be triggered manually on your workstation. Indeed, having the Github Actions build fail on the tests means that one or several functionalities have been broken.
The tests are split in several test plug-ins:
- Unit Tests:
- org.preesm.framework.tests: unit testing for commons and workflow;
- org.preesm.model.tests: unit testing of PiSDF, SLAM and Scenario models;
- org.preesm.algorithm.tests: unit testing of algorithms and codegen;
- org.preesm.ui.tests: unit testing for UI (workflow, PiSDF, Slam, Scenario);
- org.preesm.integration.tests: integration test running workflows on Preesm projects;
- org.preesm.ui.rcptt: integration tests for UI using RCPTT, actually reproducing user behavior.
Run Tests with Maven
Note: when using Maven, make sure your Eclipse either uses a different copy of the code or it is shutdown. Indeed the automatic builds of Eclipse can corrupt Maven build.
Running the tests from Maven is done by calling mvn clean verify from the root of the git repository. Because the RCPTT tests actually run a graphical Eclipse, it is advised to run the tests within a virtual framebuffer, such as Xvfb. Running the following command from the root of the git repository will automatically instantiate an Xvfb and set the DISPLAY variable accordingly before running the tests:
./releng/build_and_test.sh --fast
This is the command that is run on Github Actions.
During the execution of the tests, if some failure occurs, the output will look like the following:
[INFO] PREESM :: Parent ................................... SUCCESS [ 20.540 s]
[INFO] PREESM :: Plugins :: Parent ........................ SUCCESS [  0.349 s]
[INFO] PREESM :: Plugins :: Commons ....................... SUCCESS [  7.951 s]
[INFO] PREESM :: Plugins :: Workflow ...................... SUCCESS [  1.797 s]
[INFO] PREESM :: Plugins :: PiSDF Model ................... SUCCESS [ 47.890 s]
[INFO] PREESM :: Plugins :: Slam Model .................... SUCCESS [ 17.142 s]
[INFO] PREESM :: Plugins :: Scenario Model ................ SUCCESS [  2.466 s]
[INFO] PREESM :: Plugins :: Algorithms .................... SUCCESS [ 21.024 s]
[INFO] PREESM :: Plugins :: Command Line Interface ........ SUCCESS [  1.398 s]
[INFO] PREESM :: Plugins :: Code Generation ............... SUCCESS [ 23.573 s]
[INFO] PREESM :: Plugins :: Xtend Code Generation ......... SUCCESS [ 12.189 s]
[INFO] fi.abo.preesm.dataparallel ......................... SUCCESS [  8.959 s]
[INFO] PREESM :: Plugins :: UI ............................ SUCCESS [  1.788 s]
[INFO] PREESM :: Plugins :: PiSDF UI ...................... SUCCESS [  4.025 s]
[INFO] PREESM :: Plugins :: Scenario UI ................... SUCCESS [  2.033 s]
[INFO] PREESM :: Plugins :: IBSDF UI ...................... SUCCESS [  1.291 s]
[INFO] PREESM :: Plugins :: Slam UI ....................... SUCCESS [  0.937 s]
[INFO] PREESM :: Tests :: Parent .......................... SUCCESS [  0.178 s]
[INFO] PREESM :: Tests :: Framework ....................... SUCCESS [ 11.508 s]
[INFO] PREESM :: Tests :: Models .......................... SUCCESS [ 14.291 s]
[INFO] PREESM :: Tests :: Algorithms ...................... SUCCESS [ 17.343 s]
[INFO] PREESM :: Tests :: Integration ..................... FAILURE [07:36 min]
[INFO] PREESM :: Tests :: UI .............................. SKIPPED
[INFO] fi.abo.preesm.dataparallel.test .................... SKIPPED
[INFO] PREESM :: Releng :: Parent ......................... SKIPPED
[INFO] PREESM :: Releng :: Feature ........................ SKIPPED
[INFO] PREESM :: Releng :: Product ........................ SKIPPED
[INFO] PREESM :: Releng :: Update Site .................... SKIPPED
Such output is generated for every Github Actions workflow.
From this summary, it is straightforward to locate which plug-in caused the failure. More details can be found when scrolling up the log, for instance:
Failures:
  PiMM2SRDAGTest.testSrdag:114 Workflow [StaticPiMM2SRDAGCodegen.workflow] with scenario [4corePrediction.scenario] caused failure
  PiMM2SRDAGTest.testSrdag:114 Workflow [StaticPiMM2SRDAGCodegen.workflow] with scenario [4coreTraining.scenario] caused failure
  PiMM2SRDAGTest.testSrdag:114 Workflow [StaticPiMMCodegen.workflow] with scenario [1corePrediction.scenario] caused failure
  PiMM2SRDAGTest.testSrdag:114 Workflow [StaticPiMMCodegen.workflow] with scenario [1coreTraining.scenario] caused failure
  PiMM2SRDAGTest.testSrdag:114 Workflow [StaticPiMMCodegen.workflow] with scenario [4corePrediction.scenario] caused failure
  PiMM2SRDAGTest.testSrdag:114 Workflow [StaticPiMMCodegen.workflow] with scenario [4coreTraining.scenario] caused failure
  PiMM2SRDAGTest.testSrdag:114 Workflow [PiMM2SRDAGCodegenMemoryScriptsMixedMerged.workflow] with scenario [8coresC6678.scenario] caused failure
  PiMM2SRDAGTest.testSrdag:114 Workflow [StaticPiMM2SRDAGCodegen.workflow] with scenario [8coresC6678.scenario] caused failure
  PiMM2SRDAGTest.testSrdag:114 Workflow [XMLCodegen.workflow] with scenario [4core.scenario] caused failure
  PiMM2SRDAGTest.testSrdag:114 Workflow [XMLCodegen.workflow] with scenario [YUV4core.scenario] caused failure
  PiMM2SRDAGTest.testSrdag:114 Workflow [XMLCodegen.workflow] with scenario [lowMaxDisparity.scenario] caused failure
  PiMMFlattenerTest.testPiMMFlattener:93 Workflow [StaticPiMMFlattenerCodegen.workflow] with scenario [1corePrediction.scenario] caused failure
  PiMMFlattenerTest.testPiMMFlattener:93 Workflow [StaticPiMMFlattenerCodegen.workflow] with scenario [1coreTraining.scenario] caused failure
  PiMMFlattenerTest.testPiMMFlattener:93 Workflow [StaticPiMMFlattenerCodegen.workflow] with scenario [1core.scenario] caused failure
  TutorialsTest.test:106 Workflow [CodegenMemoryDeGreef.workflow] with scenario [4core.scenario] caused failure
  TutorialsTest.test:106 Workflow [CodegenMemoryDeGreef.workflow] with scenario [YUV4core.scenario] caused failure
  TutorialsTest.test:106 Workflow [CodegenMemoryDeGreef.workflow] with scenario [lowMaxDisparity.scenario] caused failure
  TutorialsTest.test:106 Workflow [CodegenMemoryScriptsMixedMerged.workflow] with scenario [1core.scenario] caused failure
  TutorialsTest.test:106 Workflow [CodegenMemoryScriptsMixedMerged.workflow] with scenario [4core.scenario] caused failure
  TutorialsTest.test:106 Workflow [CodegenMemoryScriptsMixedMerged.workflow] with scenario [8coresC6678.scenario] caused failure
  TutorialsTest.test:106 Workflow [CodegenMemoryScriptsMixedMerged.workflow] with scenario [YUV4core.scenario] caused failure
  TutorialsTest.test:106 Workflow [CodegenMemoryScriptsMixedMerged.workflow] with scenario [lowMaxDisparity.scenario] caused failure
  TutorialsTest.test:106 Workflow [StaticPiMMCodegen.workflow] with scenario [1core.scenario] caused failure
  TutorialsTest.test:106 Workflow [StaticPiMMCodegen.workflow] with scenario [4core.scenario] caused failure
  TutorialsTest.test:106 Workflow [StaticPiMMCodegen.workflow] with scenario [8coresC6678.scenario] caused failure
  TutorialsTest.test:106 Workflow [StaticPiMMCodegen.workflow] with scenario [YUV4core.scenario] caused failure
  TutorialsTest.test:106 Workflow [StaticPiMMCodegen.workflow] with scenario [lowMaxDisparity.scenario] caused failure
  TutorialsTest.test:106 Workflow [StaticPiMMCodegenMemoryScripts.workflow] with scenario [1core.scenario] caused failure
  TutorialsTest.test:106 Workflow [StaticPiMMCodegenMemoryScripts.workflow] with scenario [4core.scenario] caused failure
  TutorialsTest.test:106 Workflow [StaticPiMMCodegenMemoryScripts.workflow] with scenario [8coresC6678.scenario] caused failure
  TutorialsTest.test:106 Workflow [StaticPiMMCodegenMemoryScripts.workflow] with scenario [YUV4core.scenario] caused failure
  TutorialsTest.test:106 Workflow [StaticPiMMCodegenMemoryScripts.workflow] with scenario [lowMaxDisparity.scenario] caused failure

Tests run: 137, Failures: 32, Errors: 0, Skipped: 0
This log excerpt shows which tests actually failed.
In order to fix the code, we strongly advise to run the tests from Eclipse once the issue has been located.
Run Tests from Eclipse
Using Eclipse, tests are run plug-in wise only. That means you have to manually trigger the tests for all the test plug-ins independently. This is done by right clicking on a test project and then on “Run As / JUnit Plug-in Test”:
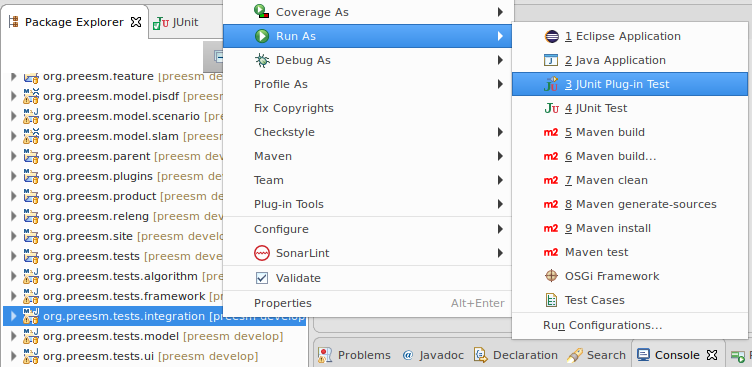
This has to be done on all plug-ins, except for the RCPTT test plug-in, where “Run As / Test Cases” (see below). Once execution of all tests terminates, a new view displays all test results:

This view will only tell which Preesm Workflow successfully terminated or not. To inspect the actual cause of the failure, the log has to be inspected. Test failures can be re-run independently in order to check the log more accurately (otherwise the log can be several thousands of lines). This is done by scrolling in the Console log. Among all the outputs, the workflow logs always start with Starting workflow execution:
[...]
13:21:03 NOTICE: Starting workflow execution: /org.ietr.preesm.stereo/Workflows/CodegenMemoryScriptsMixedMerged.workflow.
13:21:03 NOTICE: Workflow Step: 'StaticPiMM2SDF' (id 'org.ietr.preesm.experiment.pimm2sdf.StaticPiMM2SDFTask'): [StaticPiMM2SDFTask] Transforming PiGraph to SDFGraphs
13:21:04 NOTICE: PiMM2SDF transformation: 00:00:00.064s.
[...]
13:21:07 NOTICE: Workflow Step: 'Code Generation' (id 'org.ietr.preesm.codegen.xtend.task.CodegenTask'): [CodegenTask] Generate xtend code
13:21:07 SEVERE: Unexpected Exception: java.util.ConcurrentModificationException:null
 Contact Preesm developers if you cannot solve the problem.
java.util.ConcurrentModificationException
	at org.eclipse.emf.common.util.AbstractEList$EIterator.checkModCount(AbstractEList.java:751)
	at org.eclipse.emf.common.util.AbstractEList$EIterator.doNext(AbstractEList.java:699)
	at org.eclipse.emf.common.util.AbstractEList$EIterator.next(AbstractEList.java:685)
	at org.preesm.codegen.xtend.task.CodegenModelGenerator.generateActorFiring(CodegenModelGenerator.java:613)
[...]
This log shows that the Code Generation task threw an exception while attempting to modify a List while iterating on it.
RCPTT Tests from Eclipse
This procedure is specific to running RCPTT tests from Eclipse. Maven uses the product built during the full process to run the tests and run them during the build process. We strongly advise the developers to have a look at the RCPTT user guide before going further.
- Export the product using procedure described here;
- Select plugin “org.preesm.ui.rcptt.tests”, right click on it then “Run As / Test Cases”
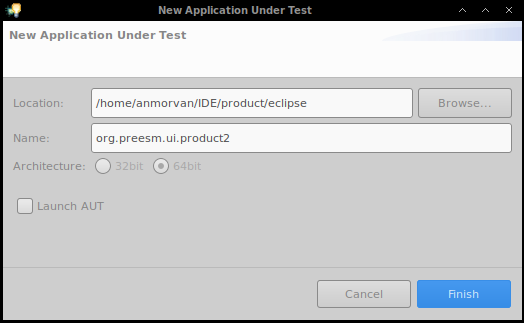
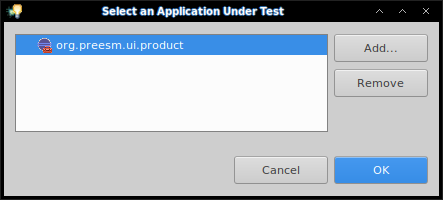
- The following window ask to choose an Application Under Test (AUT). Add a new one with the product exported from step 1:
- Before selecting OK in the AUT selection window, make sure you will not need your machine for few minutes. Indeed, automated UI tests will run graphically and require the mouse / keyboard to be unused.
- The tests will run in a new instance of Eclipse, that is the “Application Unter Test” exported in step 1. The status of the test execution is displayed in a new view:
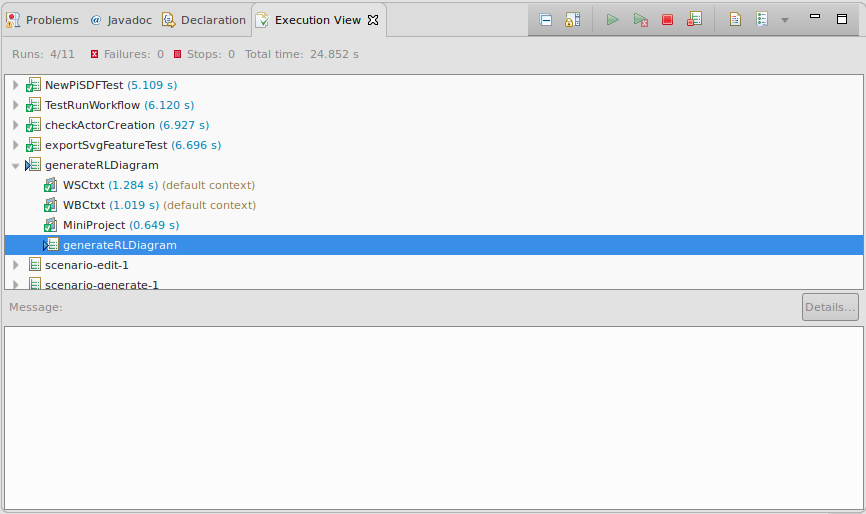
- At the end of the execution, errors can be analyzed if present. The AUT does not close by itself, and can be closed manually, or kept open for further testing (see Adding UI Tests with RCPTT).
Adding New Tests
Preesm relies on JUnit 4 for its tests. We strongly recommend the developers to read about unit testing with JUnit before implementing tests in Preesm. The following tutorial is especially relevant: https://www.vogella.com/tutorials/JUnit/article.html.
When adding a new task in Preesm, the good practice is to add unit tests for the different parts of the algorithm in the org.preesm.algorithm.tests, possibly tests in the org.preesm.model.tests if the model was updated, and some full examples with actual working Workflow, Scenario, etc. in the org.preesm.integration.tests plugin. More about unit vs integration test can be found online:
- https://www.guru99.com/unit-test-vs-integration-test.html
- https://dzone.com/articles/unit-testing-vs-integration-testing-whats-the-diff
- https://stackoverflow.com/questions/5357601/whats-the-difference-between-unit-tests-and-integration-tests
If the contribution impacts the UI, then adding RCPTT tests is advised.
Note: When testing code that works with files, please (1) make sure the path is not user dependent, and (2) make sure the test pass when run from a bundle and not from Eclipse. Indeed, the resources of a test plug-ins are accessed differently depending of how the test is run. See this issue for instance. The integration tests use a similar approach to run the workflows.
Adding Unit Tests
Unit tests are meant to test small parts (usually one method per test) of the application.
- Create a new class in one of the test plug-ins (see how test plug-ins are decomposed in the introduction of this section);
- Make sure the class name ends with Test. This is to make sure the tests will be run by the Maven plug-in, as the pattern to locate tests is
**/*Test.java **/*TestCase.java(see this doc).
- Make sure the class name ends with Test. This is to make sure the tests will be run by the Maven plug-in, as the pattern to locate tests is
- In this new class, add methods with the
@Testannotation as any JUnit test and implement it. If the test plug-in misses dependencies, add them in the manifest as ‘Required Plug-ins’; - When the test is ready, run it from Eclipse to make sure it is working properly.
- Finally add it to git and commit it as any other file.
Adding Integration Tests
Preesm integration tests check the termination status of workflows. The mini-framework takes as input a Preesm project, a workflow and a scenario, then returns a boolean telling of the workflow terminated successfully without errors. No test is done on the result of the execution of the workflow. JUnit parameterized tests helps running tests in bulk.
- Run the version of Preesm from your workspace;
- In Preesm, create a new Preesm project with a name that represents what you are testing. Make sure the name does not conflict with projects already present in the resources folder of the org.preesm.integration.tests;
- In this new project, add whatever is required to run the workflow(s) with the task you want to test. If your task does not require an application or an architecture, feel free to skip them. Since the generated code will not be executed, providing the source code for the actors can also be skipped.
- Make sure the workflow(s) terminates properly, then copy the project:

- Paste the project in the resources folder of the org.preesm.integration.tests plug-in.
- Add a Unit test in the Eclipse plugin org.preesm.integration.tests that calls
WorkflowRunner.runWorkFlowwith proper project name, workflow and scenario, and useAssert.assertTrueon the result (or false of you want to make sure the workflow fails). Check other existing tests, for instanceTutorialsTest, to get an idea of how to write bulk tests.
Adding UI Tests with RCPTT
UI Tests are run using RCPTT.
We refer the developers to the RCPTT user guide for adding RCPTT tests.
The only specific directive is to insert new tests (and their verifications and contexts) in a proper, consistent folder hierarchy of the plugin org.preesm.ui.rcptt.tests.
Coding Policies
The Preesm code base respects some coding policy. If you intend to develop within Preesm, we strongly advise you to follow these policies to prevent the continuous integration server to reject your contributions. These policies are simple:
- Follow the checkstyle format provided in the coding policy project;
- Make sure all the tests run without failure (run ‘mvn clean verify’ in the root folder of the git repository).
To help enforcing the checkstyle format, the “on-the-fly” checkstyle analyzer using the Eclipse plug-in (automatically installed with the meta feature and configured through M2Eclipse connectors) will provide feedback and the Eclipse cleanup formatter will enforce most of the rules (triggered on save action).