APOLLO - [BETA]
Writing of this tutorial is currently in progress. If you wish to follow this tutorial, please consider yourself a beta tester (and don’t hesitate to send us any improvement suggestions).
Tutorial prerequisites:
- This tutorial has been developed and tested for Ubuntu distributions
Last update the 09.05.2019 - Tutorial created the 09.05.2019 by R. Lazcano
Project setup
In addition to the default requirements (see Requirements for Running Tutorial Generated Code), please download the following files:
- Complete Matrix-Multiplication Preesm Project
- APOLLO (see below).
APOLLO setup
To be able to apply these optimizations, first APOLLO must be installed.
APOLLO installation
- Download APOLLO using git:
git clone https://scm.gforge.inria.fr/anonscm/git/apollo/apollo.git - Go into apollo folder:
cd apollo - Select the latest branch:
git checkout apolloPreesm - Create a new directory for building APOLLO:
mkdir build - Read and install all the required dependencies detailed in INSTALL:
- autoconf
- bison
- build-essential
- cmake
- flex
- git
- libboost-dev
- libboost-system-dev
- libgmp-dev
- liblapack-dev
- libtool
- ninja-build
- texi2html
- texinfo
- Run:
cmake .. -DAPOLLO_BUILD_JOBS=4(replace 4 with number of available cores) - Run:
sudo make install -j4(replace 4 with number of available cores)
Note: APOLLO installation can take up to 2 hours, so setting APOLLO_BUILD_JOBS to more than 1 is recommended. - Run:
sudo cp ../apollo/runtime/include/apolloAPI.h /usr/local/include
How to use APOLLO with a Preesm application
As described in APOLLO website, APOLLO (Automatic speculative POLyhedral Loop Optimizer) is a compiler framework dedicated to automatic, dynamic and speculative parallelization and optimization of programs’ loop nests. APOLLO can be used to further accelerate a dataflow application by combining it with Preesm. To do so, several modifications must be done within Preesm app:
Set APOLLO as the compiler
As stated before, APOLLO is a compiler, so it has to be used to compile the application. To do so, please use the CMakeLists.txt provided in Matrix-Multiplication Preesm Project or add the following to your own CMakeLists.txt:
- At the beginning of CMakeLists.txt, add the following line:
set(USEAPOLLO 1)If set to 1, this variable enables APOLLO compilation. Consequently, if you do not wish to use APOLLO, you should either comment that line or set it to 0.
- Just after the creation of the project, add the following lines:
project(Main)

if(${USEAPOLLO})
	find_library(apollo_LIBRARY LLVMApollo)
	find_library(apolloRuntime_LIBRARY apolloRuntime)
	if(apollo_LIBRARY AND apolloRuntime_LIBRARY)
		MESSAGE("")
		MESSAGE("WARNING: Using APOLLO compiler")
		MESSAGE("If you do not wish to use APOLLO, please deactivate USEAPOLLO in CMakeLists.txt")
		MESSAGE("")
		SET(CMAKE_C_COMPILER "/usr/local/bin/apolloc")
		add_definitions(-DAPOLLO_AVAILABLE)
	else()
		MESSAGE("WARNING: Couldn't find APOLLO libraries, so APOLLO compilation is disabled")
		set(USEAPOLLO 0)
	endif()

endif()
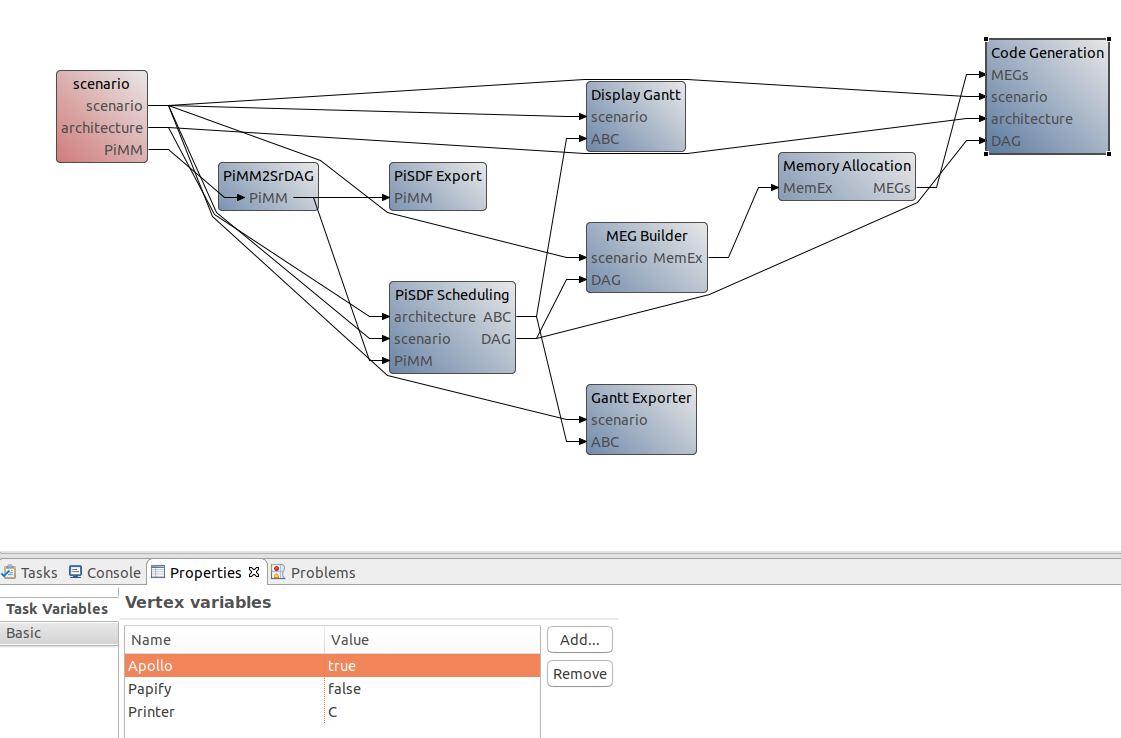
Configure the workflow of the project
- Open CodegenPiMM.workflow
- Select the ‘Code Generation’ Task
- Select the ‘Properties’ tab
- Select the ‘Basic’ tab in ‘Task Variables’
- Click on ‘Add…’ and write “Apollo”
- In the new ‘Apollo’ option of the Task Variables, write ‘true’
The resulting workflow tab should be similar to the one displayed on the following image:
Add APOLLO pragma
To use APOLLO, a specific pragma must be added surrounding the target loop nest:
#ifdef APOLLO_AVAILABLE
#pragma apollo dcop
{
#endif
	for (i = 0; i < rowsA; i++) {
		for (j = 0; j < colsB; j++) {
			mult[i*colsB + j] = 0.0;
			for (k = 0; k < colsA; k++) {
				mult[i*colsB + j] += A[i*colsA+k] * B[k*colsB+j];
			}
		}
	}
#ifdef APOLLO_AVAILABLE
}
#endif
Generate and run the application
- Run the workflow selecting as Scenario the one called 1core.scenario
- Run the CMakeGCC.sh file –>
sh CMakeGCC.sh - Go to make/bin –>
cd bin/make - Run
make - Run the application
./Release/main
Please, note that you will notice that the application runs faster after 10 iterations. This happens because the first 10 iterations are considered as a training stage and, after that, the best optimization among them is chosen and applied.
If any error appears, please, create an issue on GitHub.