HW/SW Codegeneration for ZedBoard - [BETA]
The following topics are covered in this tutorial:
- C/C++ code generation from PREESM targeting SDSoC
- Automatic generation of HW accelerators with Xilinx SDSoC
- Execution of actors in multiple HW accelerators
Prerequisite:
Project setup
All the steps describied were tried on an Ubuntu system. The procedure is exactly the same with Windows Microsoft and Mac OS.
In addition to the default requirements (see Requirements for Running Tutorial Generated Code), download the following files:
- Complete Sobel Preesm Project
- YUV Sequence (7zip) (9 MB)
- DejaVu TTF Font (757KB)
- HLS Sobel functions: github repo (git clone the repo and you will find the files in
<work_dir>/tutorials/org.ietr.preesm.sobel/Code_HLS_Vivado_SDSoC/)
Note: In addition, in order to complete the tutorial you need:
- Vivado SDSoC develop by Xilinx with a valid license (see on the Vivado website the available options to buy/try it);
- the ZedBoard. The source files can be compiled to be executed, also, on other boards with SDSoC’s support (the zcu102 equipped with the Ultrascale+ was also tested). The idea was first presented on a ReCoSoC 2017 conference paper.
Preesm Code Generation
The project modifications needed to generate code for the ARM core on ZedBoard from Preesm are presented in this section. The three important inputs for the code generation are (1) the description of the architecture on which the code generated will run, (2) the description of the application using the PiSDF MoC and (3) the scenario. The PiSDF does not need modification for this tutorial.
Definition of the Target Architecture
In the “Package Explorer” of Preesm, open the /Archi/ directory and create a copy of the “4CoreX86.slam” architecture named “2CoreARM.slam”. Follow the instructions in the tutorial Parallelize an Application on a Multicore CPU to add two new cores in the just created SLAM and delete the other four cores already present.
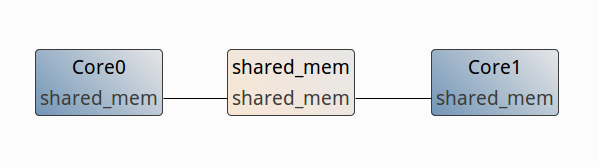
For each of the 2 cores, open the “Properties” view and change the value of the “definition” attribute from “x86” to “arm” and check the hardware ID is properly set. The “definition” attribute of the cores of the architecture is used during the workflow execution to generate adequate code for the specified targets. The S-LAM should appear as follow:
Save the S-LAM model and close the architecture editor.
The two cores will be in charge of executing the actors assigned to themselves and to trigger the execution of the actors on the Programmable Logic (PL) side by sending/retrieving data to/from the hardware accelerators.
Scenario Creation
Before generating a multicore schedule, you need to create a new scenario that will associate the Sobel algorithm with the new 2 ARM cores architecture. To do so:
- In the “Package Explorer”, create a copy of “/Scenarios/1core.scenario” and name it “2core.scenario”.
- Double-click on the new “2core.scenario” to open it with the Scenario Editor.
- In the “Overview” tab, set the “Architecture file path” to “/Archi/2CoreARM.slam”.
- Save the scenario, close it and reopen it to take the new architecture into account in the editor (technical issue).
- In the “Constraints” tab, allow the execution of all actors on all cores of the architecture.
- In the “Simulation” tab, allow the execution of the broadcast/implode/explode actors on all cores; in the “Main operator selection” select “core0”; in the “Main ComNode selection” select “shared_mem”.
- Save the updated scenario.
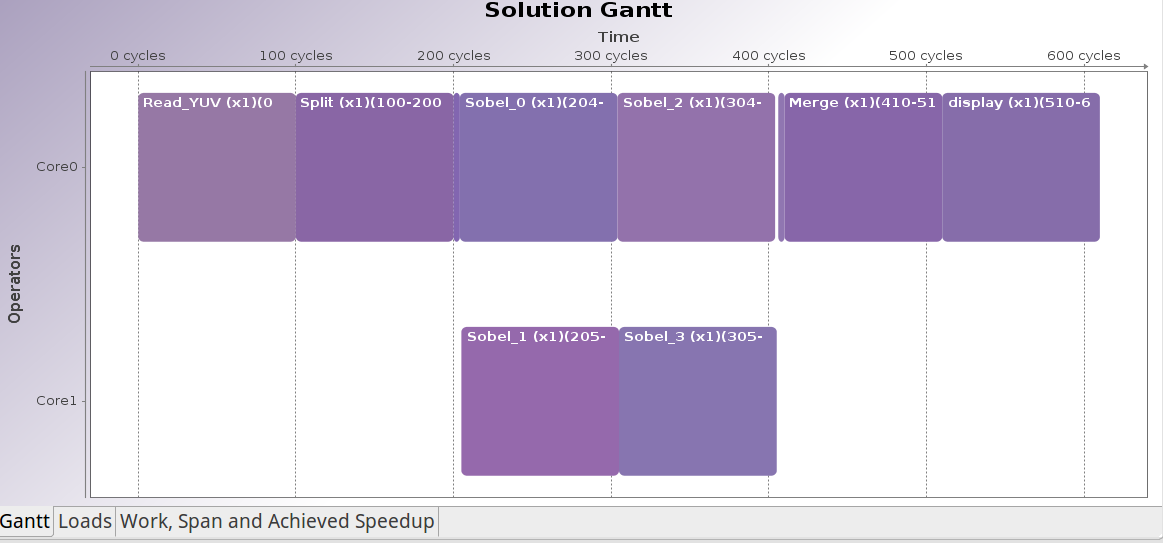
Code generation
You can now run the “Codegen.workflow” with the new scenario. The generated schedule should make use of the 2 cores, as displayed in the produced Gantt graph.
Hardware accelerator generation (SDSoC)
Before the automatic generation of the hardware accelerators by SDSoC, some changes are needed to the code of the functions that we want to move onto the Programmable Logic (PL).
Fetch the source files
To complete this tutorial, we are proving the already optimized version of the Sobel filter in HLS. Further optimizations and changes are up to the readers.
Moreover, SDSoC will produce automatically the whole logic infrastructure and all the software drivers to use, correctly, the hardware accelerator into the PL.
The functions can be download from this link (github repo–> git clone the repo and you will find the files in <work_dir>/tutorials/org.ietr.preesm.sobel/Code_HLS_Vivado_SDSoC/): all the #pragma (i.e. directives) are used by the sdscc/sds++ compiler to drive the synthesis of the logic of the accelerator. More details on SDSoC can be foung in the user manual.
Create a new SDSoC project
The following steps will guide you through the creation and the configuration of the CCS project:
- Open SDSoC and create a new project: File > New > SDx Project.
- Choose the project type to create: Project Type > Application Project and click Next.
- Choose a name for your application: “Sobel_4hw”, use default location and click Next.
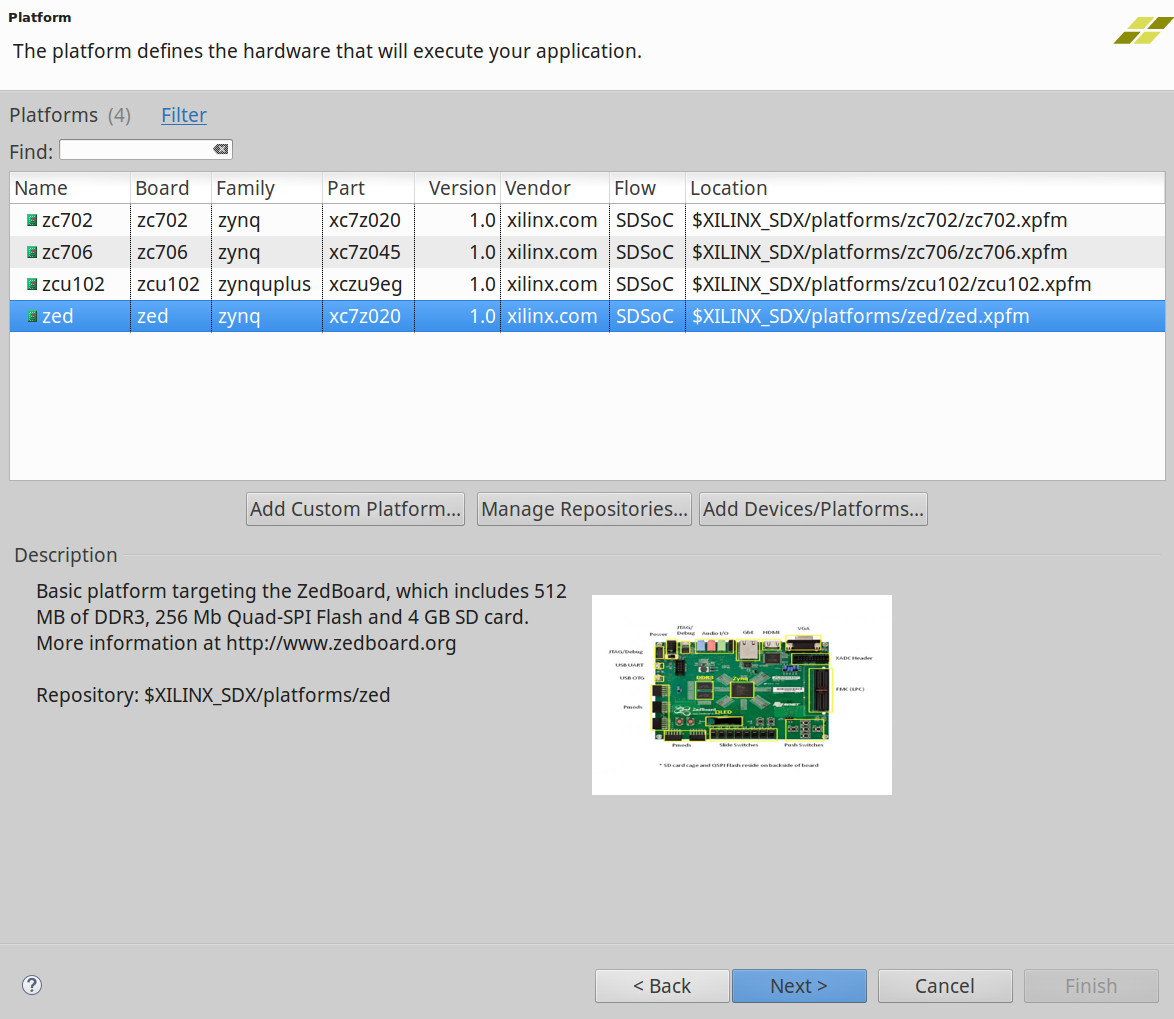
- Choose the platform where the code should be run and click Next:
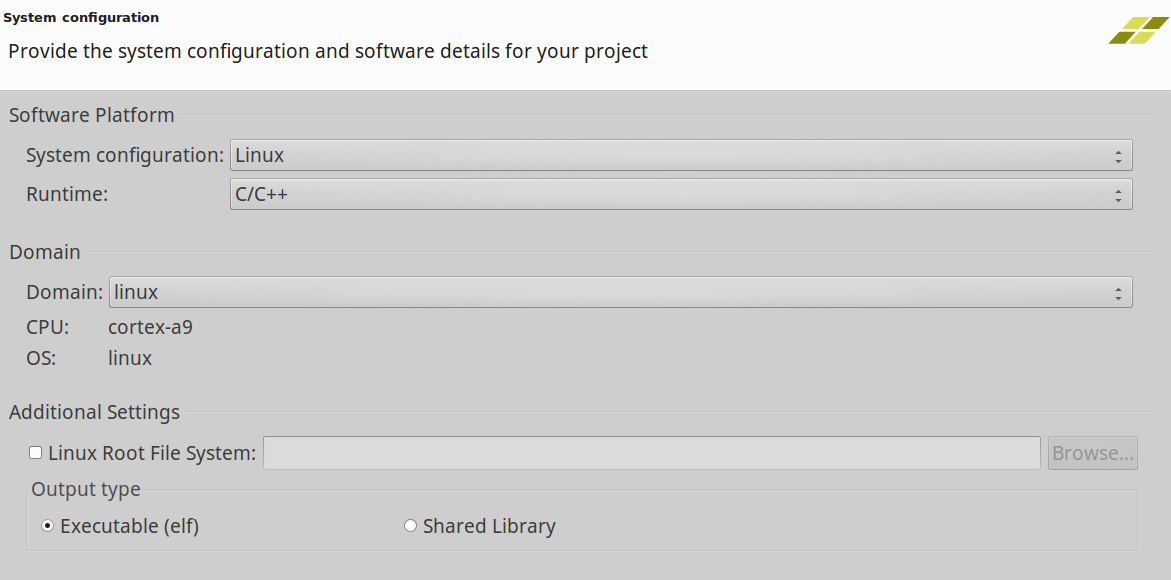
- Choose the System Configuration as shown below and click Next:
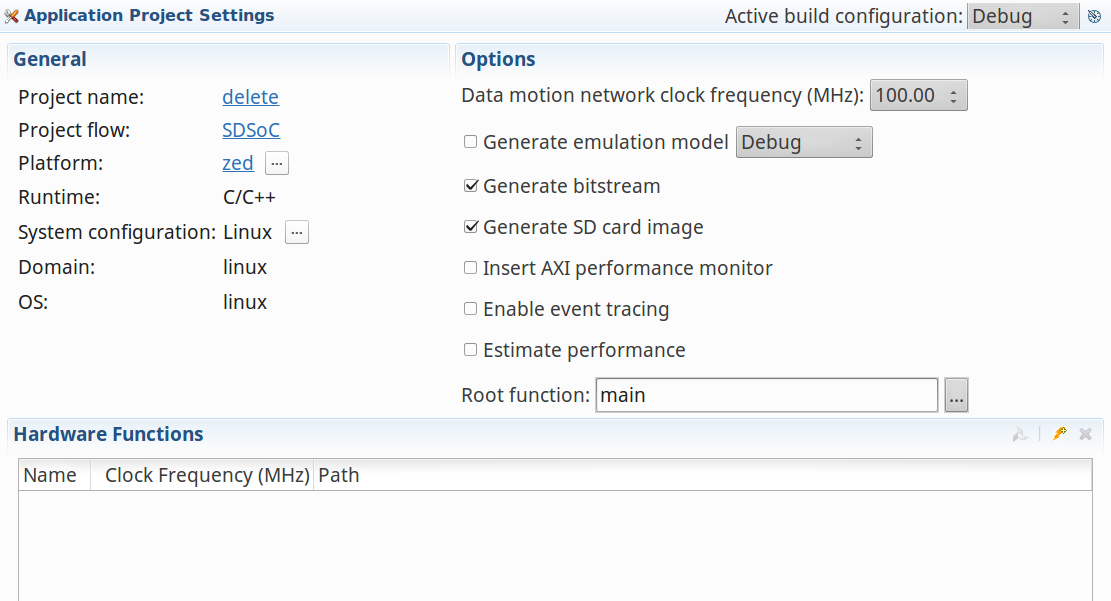
- Choose an “Empty Application” as template and click “Finish”. The Application Project Setting should appear like this:
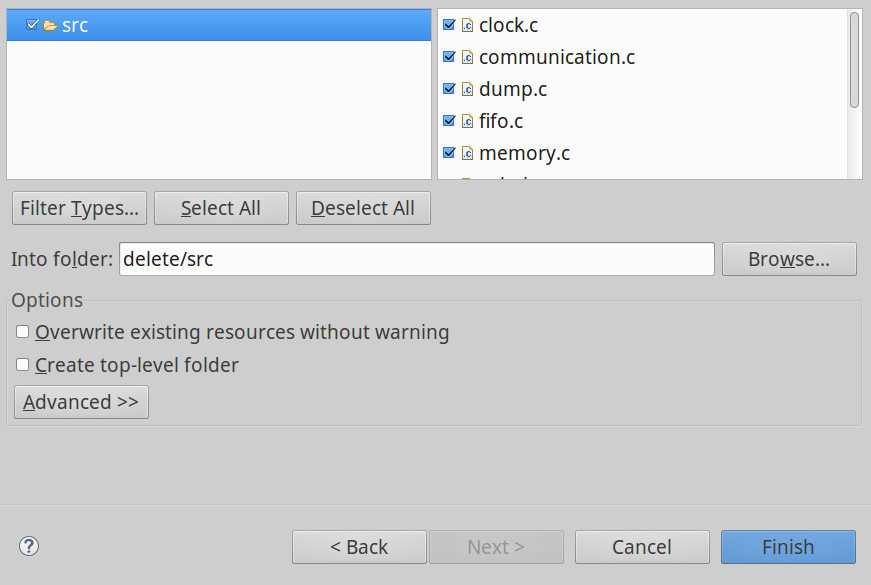
- Right click on src folder and and select “Import” to import the source files of the project.
- An “Import” wizard will appear. Choose “General > File System > Browse and select the folder of the PREESM project
<PreesmWorkSpacePath>/org.ietr.preesm.sobel/Code/src:
- After select the “src” folder (to automatically select all the files within) and click on Finish:
- The operations should be repeated to include all the files of the project in the folder. From:
a.<PreesmWorkSpacePath>/org.ietr.preesm.sobel/Code/include
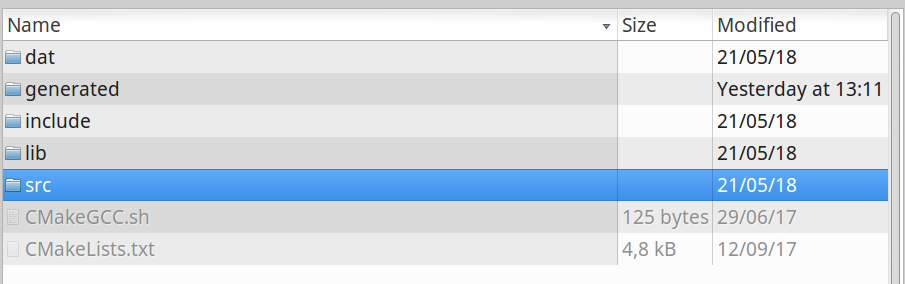
b.<PreesmWorkSpacePath>/org.ietr.preesm.sobel/Code/generated - Verify that, in the Project Explorer, all the files are included correctly under the folder “src”:

- Import the Sobel Hardware files (HLS source) downloaded and import them in the “src” folder of the project.
We are now ready to modify the source file.
3.3. Modify the source files to be ready for the SDSoC compilation
In order to execute the application on the board some modification are needed:
- Because the Graphical Interface is not present in the OS Linux-based generated by SDSoC, the function “yuvDisplay” should be changed (for example with another one that saves the output file on the SD card or, more complex, creating the necessary hardware to have a stream output on the VGA output). In the downloaded file we provide a “dummy” function that can be used instead to save the video output on the SD card. You are free to use it or another instead.
- The “sobel.h” should include the declaration of the new functions containing the HLS C++ code.
- All the
#include ../include/xxx.hmust be substituted with the version#include "xxx.h"because all the file are in the same folder. In our case:- in the Core0.c and Core1.c the line
#include "../include/x86.h">#include "x86.h". - in dump.c
#include "../include/dump.h">#include "dump.h". - in splitMerge.c
#include "../include/splitMerge.h">#include "splitMerge.h". - in yuvRead.c
#include "../include/yuvRead.h">#include "yuvRead.h".
- in the Core0.c and Core1.c the line
- In the yuvRead.h, change
#define PATH PROJECT_ROOT_PATH "/dat/akiyo_cif.yuv"
with
#define PATH "/mnt/akiyo_cif.yuv".
3.4. Software execution of the application
Now, SDSoC should compile with no errors. The obtained cross-compiled Sobel_4hw.elf can be executed on the board (please note that it is just a software version with NO hardware accelerators). To complete the step, just copy the contents of the folder <SDSoC Workspace>/Sobel_4hw/Debug/sd_card in an empty SD to be inserted in the ZedBoard card slot together with the “akiyo.yuv”. Running the application:
root@avnet-digilent-zedboard-2017_4:/mnt# ./Sobel_4hw .elf

Main: 299 frames in 4611988 us - 64.831045 fps

Main: 299 frames in 4629939 us - 64.579685 fps

Main: 299 frames in 4618048 us - 64.745971 fps

…
The last step of the tutorial is to create the hardware accelerators making use of the files download in 3.1.
Import the following files into the “src” folder:
dummy.hdummy.csobel.hsobel_hw.cppap_video.hpp
and substitute the original sobel.h with the one present in the download file. To do so:
- Right click on “src” folder and and select “Import” to import the new source files of the project.
- An “Import” wizard will appear. Choose “General > File System > Browse and select the folder of the downloaded file.
- Select the files you want to add and then click Finish.
- If SDSoC asks Overwrite ‘
sobel.h’ in the folder ‘Sobel_4hw.h’? click on YES.
You are ready now to change the function sobel(...) in the Core0.c and Core1.c with the the HLS version provided in “sobel_hw.c”: sobel_filter0(...). So in the file Core0.c and Core1.c, substitute the lines as follow:
sobel(...);
with
sobel_filter0(...);
Remember to repeat the substitution with the all four different instances of the Sobel filter.
In order to create four different hardware accelerators (one for each call), we need to use the “SDSoC pragma resource”. The calls of the Sobel function in the file Core0.c should appear, now, as shown following:
#pragma SDS resource(1)
sobel_filter0(output_0__input__0,output__input_0__0,74/*height*/);// Sobel_0
and
#pragma SDS resource(2)
sobel_filter0(output_52096__input__0,output__input_52096__0,74/*height*/); // Sobel_2
In the file Core1.c:
#pragma SDS resource(3)
sobel_filter0(output_26048__input__0,output__input_26048__0,74/*height*/); // Sobel_1
and
#pragma SDS resource(4)
sobel_filter0(output_78144__input__0,output__input_78144__0,74/*height*/); // Sobel_3
Now press the build button  and SDSoC will generate the bitstream, the stub functions of the hardware and all the necessary infrastructure in the PL. This process can take few minutes (depending on the host machine).
At the end of the process, copy the content of the folder Sobel_4hw/Debug/sd_card on the SD card, add the video sample of the application “akiyo.yuv” in the same folder and boot the system. Insert the card on the board and boot the system. From the remote command line, navigate to reach the folder “/mnt/” and execute the program:
root@avnet-digilent-zedboard-2017_4:/mnt# ./Sobel_4hw.elf

Main: 299 frames in 944048 us - 316.721184 fps

Main: 299 frames in 933216 us - 320.397421 fps

Main: 299 frames in 934212 us - 320.055833 fps

Main: 299 frames in 945043 us - 316.387720 fps

Main: 299 frames in 936284 us - 319.347548 fps

Main: 299 frames in 933285 us - 320.373734 fps

Main: 299 frames in 934458 us - 319.971577 fps

Main: 299 frames in 941241 us - 317.665720 fps

Main: 299 frames in 933302 us - 320.367898 fps
END
Up to the readers further tests using other kind of SDSoC pragmas. Also, all the steps can be repeated targeting other platform like, for example, the Zynq Ultrascale+ natively supported by the current version of SDSoC (just choosing , in the step 4 of the paragraph 3.2, the zcu102 board).
Once the optimal setting for your function is set up, the entire process here exposed can be repeated using more or less CPUs (i.e. threads) to call more or less hardware accelerators. The entire automated method ease the Design Space Exploration of the application when using such Heterogeneous Multiprocessor System-on-a-Chip with programmable hardware acceleration.