HW/SW code generation for MPSoCs
The following topics are covered in this tutorial:
- design and development of ARTICo³’s applications (with automatic code generation).
Prerequisite:
Tutorial created the 07.23.2020 by L. Suriano
Introduction
In order to despatch jobs on HW on the FPGA, we are making use of ARTICo³, an open-source runtime reconfigurable processing architecture to enable hardware-accelerated high-performance embedded computing. It provides (among the other features):
- a HW architecture to dispatch jobs, send and receive data, among multiple accelerators
- a set of APIs to manage the HW accelerators
- a framework to create the bitstreams for the FPGA
For more details (documentation and tutorials), please visit its official website.
By describing the architecture (i.e., the set of CPUs and the set of accelerators), PREESM automatically generates the application code.
The application selected for this tutorial is a Matrix Multiplication. A tutorial for the HW accelerators’ synthesis is available here. However, few modifications were necessary to allow a further parameter-input. The code is also provided within the instruction of this tutorial.
PREESM Code generation
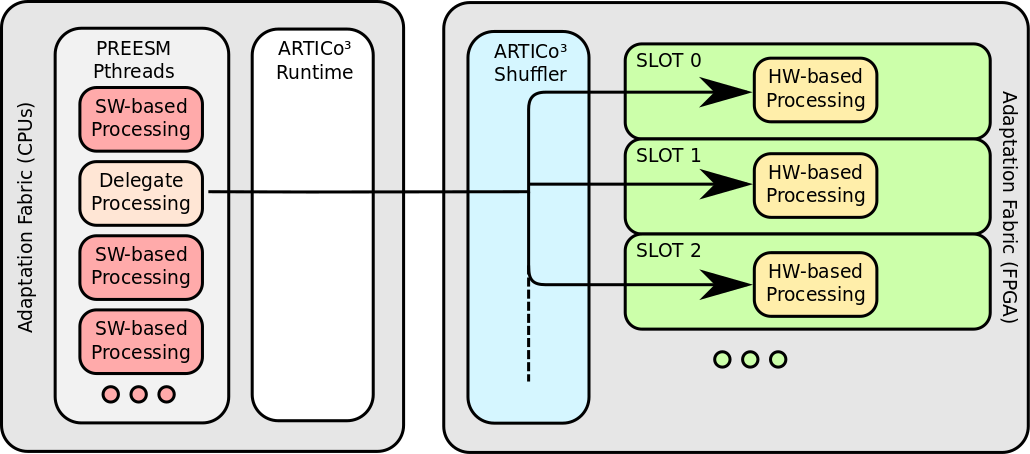
Following the tutorial’s instruction, PREESM will automatically generate a set of threads (one per CPU) and a further thread that will be in charge of handling the communication with the HW accelerator. Specifically, it will delegate the computation to a specific slot into the FPGA, making use of the ARTICo³ runtime.
The following Figure shows the idea graphically:
Download HW source file
The hardware accelerator was created using High-Level Synthesis (HLS). The source file can be download from their repository:
git clone https://github.com/leos313/flexible_GSZIE_matmul
Although the bitstreams are already provided (this way, it will be easier to complete the tutorial in a few minutes), the repo contains all the files you need to re-run the synthesis from scratch. Specifically, you can find the HLS source code and an application to test the bitstream just created.
The step to follow are described in detail within the ARTICo³ website.
Initial project setup
1 Clone the ARTICo3 repository and create the bitstreams
- clone the ARTICo³ repository and switch to the branch
a9c93c1
$ git clone https://github.com/des-cei/artico3
$ cd artico3/
$ git checkout a9c93c1
Following the steps described in the tutorial Hello world, use the files flexible_GSIZE_matmul to create the bitstream for your FPGA (or use the already provided for the ZCU102 board equipped with a Zynq Ultrascale+).
Deployment
Under construction.