Papify - [BETA]
Writing of this tutorial is currently in progress. If you wish to follow this tutorial, please consider yourself a beta tester (and don’t hesitate to send us any improvement suggestions).
Tutorial prerequisites:
- This tutorial has been developed and tested for Ubuntu distributions
Last update the 10.01.2019 - Tutorial created the 06.20.2018 by D. Madroñal
Project setup
In addition to the default requirements (see Requirements for Running Tutorial Generated Code), download the following files:
- Complete Sobel Preesm Project
- YUV Sequence (7zip) (9 MB)
- DejaVu TTF Font (757KB)
- Papify (see below).
PAPI and Papify Setup
In order to get access to the Performance Monitor Counters (PMCs) existing in the current processors, it is necessary to install the Performance API (PAPI) library. Additionally, to increase the abstraction layer and to reduce the length of the auto-generated papified code, Papify tool will be used.
PAPI instalation
- Create a new directory to download PAPI repository
- Clone it using git ->
git clone https://bitbucket.org/icl/papi.git - Go to papi/src (
cd papi/src) - Run
./configure - Run
make - Run
make fulltest-> This will run the testing part of PAPI (it may take a while)- Please, if several errors appear, check Issue 1 at the Papify troubleshooting section at the end of this tutorial before continuing
- Run
sudo make install-all-> This will install the library as a system library - Run
papi_avail-> This command will display the available events on your system and will help you to check whether the library has been correctly installed
Papify installation
To include Papify in the project, there are two options. The first one is the starting project with all the changes included while the second explians, step by step, all the required changes to work with both PAPI and Papify:
- (1) The starting project with all the changes included is available [here].
- (2) Download Papify from the repository:
- (a) Clone using ssh from git@gitlab.citsem.upm.es:papify/papify.git
- or (b) Clone using http from https://gitlab.citsem.upm.es/papify/papify.git
- or (c) Download it from https://gitlab.citsem.upm.es/papify/papify/repository/master/archive.zip
- (3) Copy “eventLib/src/eventLib.c” to “org.ietr.preesm.sobel/Code/src/” directory
- (4) Copy “eventLib/include/eventLib.h” to “org.ietr.preesm.sobel/Code/include/” directory
- (5) Open “CMakeLists.txt” and insert the following lines after the pthread section
# *******************************************
# ************ PAPI LIBRARY *****************
# *******************************************

find_library(papi_LIBRARY papi)
- (6) Change the target_link_libraries to add PAPI linkage
target_link_libraries(sobel ${SDL2_LIBRARY} ${SDL2TTF_LIBRARY} ${CMAKE_THREAD_LIBS_INIT} ${papi_LIBRARY})
- (7) In case it is not present, add this line at the end of the CMakeLists.txt
set(CMAKE_C_FLAGS "-std=gnu99") - (8) Finally, in order to actually enable Papify monitoring, add this line in the /include/preesm.h file. Please, note that if it is not done, the application will run without any monitoring
#define _PREESM_PAPIFY_MONITOR
Generate the platform supported PAPI events
- Open a terminal and go to your project directory
- run
papi_xml_event_info > PAPI_info.xml
This will generate an xml file with the available PAPI components and events of your computer. If you want to develop code for a different platform, run this command on the target platform and its monitoring options will be gathered in that file. In this case, copy the generated file on your project directory to gain access to the information from PREESM.
Configure the monitoring of the project
- Go to the Scenarios folder a duplicate the 4core.scenario by creating a new one called 4corePapify.scenario
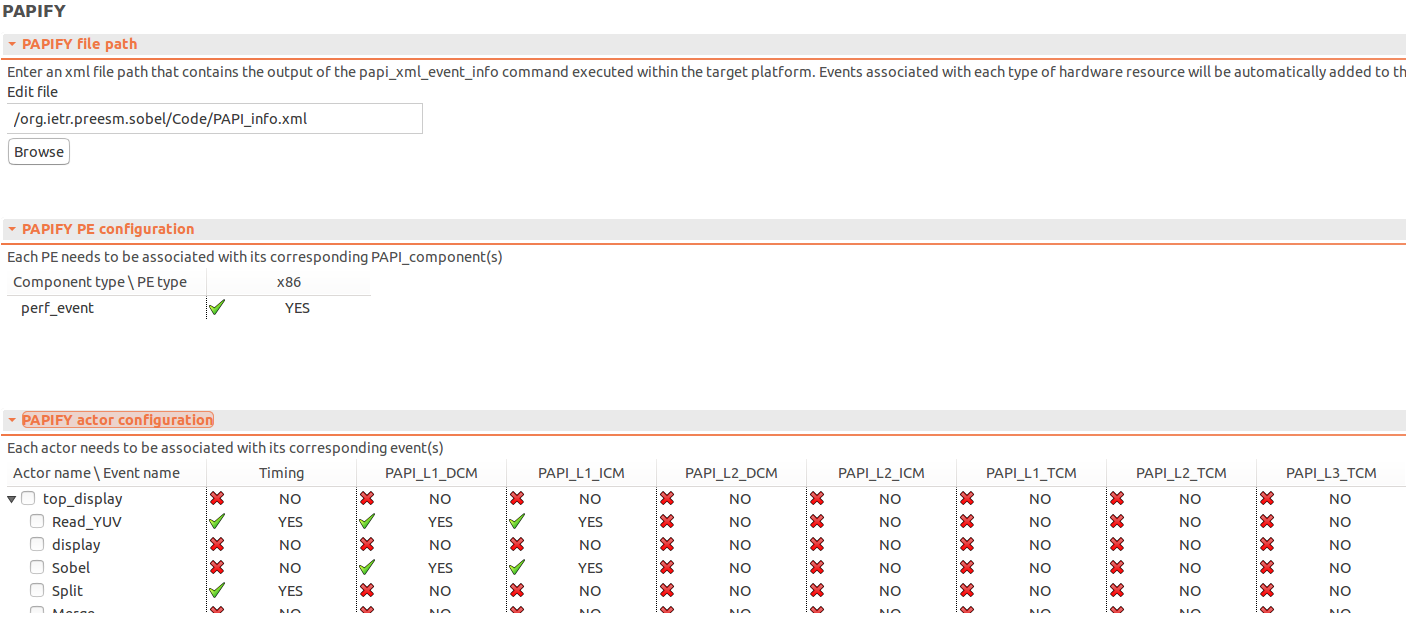
- Open the new 4corePapify.scenario and go to the PAPIFY tab, which has three different sections
- PAPIFY file path: to import the xml information previously generated
- PAPIFY PE configuration: to associate the different types of Processing Elements (PE) defined in the architecture with a PAPI component
- PAPIFY actor configuration: to define, for each actor defined in the algorithm, the events that will be monitored during the execution. To obtain a short description of one event, please, place the mouse over it and the description will appear
- To import the monitoring data, in the PAPIFY file path section, click on the browse button and select the PAPI_info.xml file previously generated
- After that, in the PAPIFY PE configuration, select the PAPI component for the x86 type of PE: perf_event for the CPU
- Finally, in the PAPIFY actor configuration, select the PAPI events:
- Split: Timing (for monitoring execution time)
- Sobel: PAPI_L1_DCM and PAPI_L1_ICM (data and instruction misses from the Level 1 Cache memory)
- Read_YUV: Timing, PAPI_L1_DCM and PAPI_L1_ICM
- display and Merge –> No selection (no monitoring)
The resulting scenario tab be the equivalent to the one displayed on the following image.
Configure the workflow of the project
- In the Workflows folder copy the one called Codegen.workflow and create a new one called CodegenPapify.workflow
- Select the ‘Code Generation’ Task
- Select the properties tab
- In the ‘Papify’ option of the Task Variables, write ‘true’
Generate and run the application
- Run the workflow selecting as Scenario the one called 4corePapify.scenario
- Run the CMakeGCC.sh file –>
sh CMakeGCC.sh - If not done yet, please, copy the Papify files from the Papify repository:
- eventLib/src/eventLib.c into org.ietr.preesm.sobel/Codet/src
- eventLib/include/eventLib.h into org.ietr.preesm.sobel/Code/include
- Go to make/bin –>
cd bin/make - Run
make - Run the application
./Release/sobel(Don’t forget to add the akiyo_cif.yuv and the DejaVuSans.ttf files in the /Code/dat folder)
If any error appears, please, create an issue on github.
Check the results
Once the application finishes, a new folder called papify-output should have appeared. In this folder, a different file for each actor is created. In each of them, a new line is printed after every actor execution gathering the monitoring information.
In order to analyze these results, we provide below a shell script code to extract the minimum/average/maximum execution time of each actor (or papify_ouput file). This script can be used as a template to analyze other events.
#!/bin/bash

ACTORS=$(ls *.csv | cut -d"." -f1 | colrm 1 14)

for ACTOR in ${ACTORS}; do
  [ "$ACTOR" == "profiling" ] && continue
  TIMES_ALL=$(cat papify_output_${ACTOR}.csv | cut -d',' -f 3-4 | tail -n +2)
  MIN=$((2**31))
  MAX=0
  COUNT=0
  SUM=0
  for TIMES in ${TIMES_ALL}; do
    TINIT=$(echo ${TIMES} | cut -d',' -f1)
    TSTOP=$(echo ${TIMES} | cut -d',' -f2)
    LATENCY=$((TSTOP - TINIT))
    SUM=$((SUM + LATENCY))
    MIN=$((MIN>LATENCY?LATENCY:MIN))
    MAX=$((MAX<LATENCY?LATENCY:MAX))
    COUNT=$((COUNT+1))
  done
  MEAN=$((SUM / COUNT))
  echo "Actor '${ACTOR}' timing (min/mean/max) over ${COUNT} measures: $MIN / $MEAN / $MAX"
done
Papify troubleshooting
- Issue 1: PAPI library has no access to the Performance Monitoring Counters
- In this situation, it is highly likely your computer has a high level of paranoid (see this link for more information) regarding the access to performance monitoring. To solve this issue and reduce the paranoia level, as mentioned here, the user should execute:
- (1) To use during this system boot:
sudo sh -c 'echo 1 >/proc/sys/kernel/perf_event_paranoid' - (2) To make the change persist across reboots:
sudo sh -c 'echo kernel.perf_event_paranoid=1 > /etc/sysctl.d/local.conf'
- Issue 2: eventLib not working after PREESM update
- Check if there is a new version of the library in Papify repository
- If so, please, update eventLib in src and include folders