Import/Export an SDF3 Graph
⚠️ Note: The lastest versions of Preesm, since 3.1.0, do not support this tutorial. Please use version 3.0.1 or earlier to run this tutorial. ⚠️
The following topics are covered in this tutorial:
- Creation of a new Workflow
- Importation of SDF3 SDF Graphs
- Exportation of SDF3 SDF Graphs
Prerequisites:
Tutorial created the 03.20.2013 by K. Desnos. Last update the 03.20.2014.
SDF For Free (SDF3)
SDF3 is a tool for generating random Synchronous DataFlow Graphs (SDFGs), if desirable with certain guaranteed properties like strongly connectedness. It includes an extensive library of SDFG analysis and transformation algorithms as well as functionality to visualize them. The tool can create SDFG benchmarks that mimic DSP or multimedia applications. [Source]
SDF3 is developed by the Electronic Systems Group of the Eindhoven University of Technology. More information on SDF3 can be found on the official SDF3 Website.
How to import an SDF3 Graph
To illustrate how to import an SDF3 Graph, we will create a workflow that imports an SDF3 Graph, schedules it on an multicore architecture and exports the results.
Set up the project
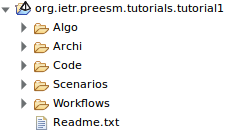
Download the project files from tutorial introduction and import them in Preesm. The Package explorer should contain the following elements:
Create a new Workflow
- (1) Right-click on /Workflows, and select “New/Other…”.
- (2) In the opened wizard, select DFTools/Workflow and click Next
- (3) Name your workflow “SDF3ImportAndListMapper.workflow” and click Finish.
A new workflow editor tab will open in Preesm to edit your workflow.
Add Workflow tasks
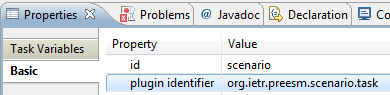
- (1) Add a new scenario vertex to your workflow and name it “scenario”. To do so, simply click on “Scenario source” in the Palette on the right of the editor then click anywhere in the editor.
- (2) Select the new scenario vertex. In the “Basic” tab of its “Properties”, set the value of the field “plugin identifier” to “org.ietr.preesm.scenario.task”.
- (3) Add a new Task vertex to your workflow and name it “SDF3 Importer”. To do so, simply click on “Task” in the Palette on the right of the editor then click anywhere in the editor.
- (4) Select the new task vertex. In the “Basic” tab of its “Properties”, set the value of the field “plugin identifier” to “org.ietr.preesm.algorithm.importSdf3Xml.Sdf3Importer”.
- (5) Repeat steps 3. and 4. with the following task names and plugin identifiers:
| Task Name | Plugin Id |
|---|---|
| Exporter 1 | org.ietr.preesm.plugin.exportXml.sdf4jgml |
| Single-Rate Conversion | org.ietr.preesm.plugin.transforms.sdf2hsdf |
| Exporter 2 | org.ietr.preesm.plugin.exportXml.sdf4jgml |
| LIST Scheduler | org.ietr.preesm.plugin.mapper.listscheduling |
| Gantt Plotter | org.ietr.preesm.plugin.mapper.plot |
| DAG Exporter | org.ietr.preesm.mapper.exporter.DAGExportTransform |
Complete the Workflow
Add connections between the workflow tasks as presented in the following figure :
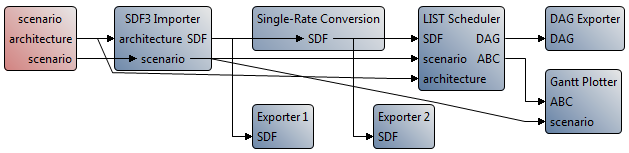
To add a new connection, simply select “Data transfer” in the Palette and click successively on the two tasks you want to link. Enter the names of the tasks ports in the two dialog boxes that will open successively. Use exactly the same ports names as the one displayed in the figure, otherwise the workflow will not work properly.
Get an SDF3 graph
Download or generate an SDF graph in the SDF3 format. In this tutorial, we will use an H263 Encoder that is a slightly modified version of the SDF3 example downloadable on the SDF3 website.
Put a copy of the “h263encoder.xml” file in the “Algo” folder of your Preesm project.
Configure the Workflow tasks
Several tasks of the workflow must be configured before running the workflow. To do so, select the tasks and check the “Task Variables” tab in the “Properties Editor”. Hereafter is a list of the properties to set:
| Task Name | Property Name | Value |
|---|---|---|
| Exporter 1 | path | ./Algo/generated/imported_sdf3.graphml |
| Exporter 2 | path | ./Algo/generated/srsdf.graphml |
| DAG Exporter | path | ./Algo/generated/dag.graphml |
| SDF3 Importer | path | ./Algo/h263encoder.xml |
Workflow Execution
You can now run the workflow using the procedure presented in tutorial1. In the current example, the algorithm given by the selected scenario is not important. Indeed, only the architecture defined in the scenario will be used by our workflow.
Open the exported graphs to see the result of the workflow execution. For example, the following figure presents the content of the “imported_sdf3.graphml” file.
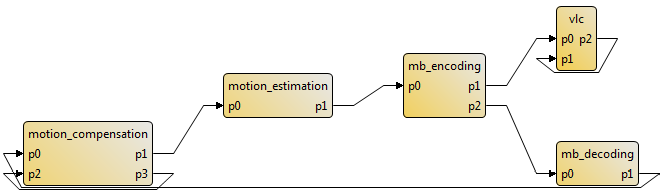
In this example, actors of the imported graph can be executed on all cores of the architecture defined in the executed scenario.
How to Export an SDF3 Graph
The exportation process of an SDF3 graph from PREESM is much simpler than the importation process. To export a graph edited with Preesm graphical interface, you simply need to create a valid scenario for this graph and execute it with an appropriate workflow.
Set up the project
Download the project files from tutorial introduction and import them in Preesm. The Package explorer should contain the following elements:
Create a new Workflow
- Right-click on “/Workflows”, and select “New/Other…”.
- In the opened wizard, select DFTools/Workflow and click Next
- Name your workflow “SDF3Export.workflow” and click Finish.
A new workflow editor tab will open in Preesm to edit your workflow.
Add Workflow tasks
- (1) Add a new scenario vertex to your workflow and name it “scenario”. To do so, simply click on “Scenario source” in the Palette on the right of the editor then click anywhere in the editor.
- (2) Select the new scenario vertex. In the “Basic” tab of its “Properties”, set the value of the field “plugin identifier” to “org.ietr.preesm.scenario.task”.
- (3) Add a new Task vertex to your workflow and name it “ExporterSDF3”. To do so, simply click on “Task” in the Palette on the right of the editor then click anywhere in the editor.
- (4) Select the new task vertex. In the “Basic” tab of its “Properties”, set the value of the field “plugin identifier” to “org.ietr.preesm.algorithm.exportSdf3Xml.Sdf3Exporter”.
- (5) Repeat steps 3. and 4. with the following task names and plugin identifiers:
| Task Name | Plugin Id |
|---|---|
| PiMM2SDF | org.ietr.preesm.experiment.pimm2sdf.StaticPiMM2SDFTask |
| HierarchyFlattening | org.ietr.preesm.plugin.transforms.flathierarchy |
Complete the Workflow
Add connections between the workflow tasks as presented in the following figure :
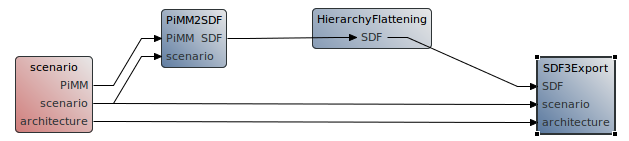
To add a new connection, simply select “Data transfer” in the Palette and click successively on the two tasks you want to link. Enter the names of the tasks ports in the two dialog boxes that will open successively. Use exactly the same ports names as the one displayed in the figure, otherwise the workflow will not work properly.
Note that the “HierachyFlatening” task is not necessary to export an SDF3 graph. This task was added to the workflow only to illustrate the fact that the SDF3 Exporter task can take as an input the result of a hierarchy flattening or the result of a single-rate transformation. However, in the simplest case, the SDF3 Exporter could be connected directly to the PiMM2SDF task.
Configure the Workflow tasks
Several tasks of the workflow must be configured before running the workflow. To do so, select the tasks and check the “Task Variables” tab in the “Properties Editor”. Hereafter is a list of the properties to set:
| Task Name | Property Name | Value |
|---|---|---|
| HierarchyFlattening | depth | 3 |
| ExporterSDF3 | path | ./Code/SDF3/graph.xml |
Workflow Execution
Before runnng the new workflow, make sure that a “SDF3” folder exists in the “Code” directory of your project. You can now run the workflow using the procedure presented in tutorial introduction.
Open the exported graphs to see the result of the workflow execution. The exported XML can be used with all SDF tools from the SDF3 framework.
Known Limitations
Here is a list of known limitations of the SDF3 importation process:
- Only SDF graphs can be imported
- Actors of the SDF cannot be implemented on more than one processor type
- Timings cannot depend on parameters since SDF3 does not support parameterized SDF